 You’ve registered your domain name, and finished installing WordPress but now you’re looking at your website and it looks nothing like you want it to be. You’re expecting to see more than just some black text on a white background and now directions on how to turn it into the website that you imagined.
Don’t worry, this is the default page the comes with WordPress and will be replaced as soon as you get started adding your own content.
So let’s dive in and take a look at the first six things to do after installing WordPress…
1. Log in and look around
First thing to do is to log in to the admin side of your site, take a look around and make the first changes. To login you need to open the login page (http://yourdomain.com/wp-login.php) and enter the username (usually “admin”) and password that you set up when you installed WordPress.
On the left side of the screen you’ll see a list of options that enable you to manage your website. Look down along the menu until you “Users” and click on it to see the user list. There’ll only be one; your admin account. As this is the default account it should be disabled to reduce the risk of it being hacked and replaced with a personal login. To do this just click on the “Add New” button at the top left of the page. You’ll need to provide the information in table.
| Username (required) | Remember This. You’ll need it to log in. |
| Email (required) | Self-explanatory |
| First Name / Last Name | Self-explanatory |
| Password | Click “Show password” and type in your own |
| Send User Notification | Click this to get a confirmation email |
| Role | IMPORTANT! Set this to Administrator |
Then just click the “Add New User” at the bottom of the screen to save your work. Once this is done log out and then log in using the new account that you’ve created. If it works, go to the “Users” section again and delete the original Admin account by pointing your mouse at the name which will give you the option to delete it (or use the checkbox option if you’re on a tablet).
2. Get Secure
 As WordPress is so popular, the bad guys spend a lot of time trying to find ways break in, so let’s make it hard for them. We recommend using a plugin (the WordPress name for additional functionality) called iThemes Security to handle this for you.
To install this plugin click on “Plugins” in the menu on the left of the screen and then on “Add New” in the top left of the page that appears. This will open a page with some featured plugins and a search box on the right side. Type in “iThemes Security” and hit enter.
Click on “Install Now” and watch it installing. Then go to your plugins page again, find the iThemes Security plugin and click on “Activate”. Finally, on your plugins page, click settings for the iThemes plugin, and the top item will be “Security Check”. Click on this and then on “Secure Site” to complete the installation. Well done, you’ve just taken a big step in securing your website from the bad guys.
3. Back It Up
 We all know that things can go wrong and when they do you’ll be glad of the precautions that you’ve taken. One of the best precautions you can take is to make sure that you have a regular backup of your website. This can be made much easier by installing a plugin like Updraft Plus. This will do the hard work for you and allow you to replace a part or your entire website if something goes wrong.
Simply install it using the same process as outlined earlier and when it’s activated click on “Settings” in your main WordPress menu (on the left of the page) and then click on “Updraft Plus Backups” from the sub-menu that appears.
Click on the “Settings” tab on the page that loads and choose how/where you want your backups to be saved too. Then whenever you need to make a backup (every time you change something) just click on the big “Backup Now” button and you’re covered.
4. Get Your SEO Started
 If you’ve got a website you’ll want search engines (Google) to know that you exist, and to tell the world about you. To do this you need SEO (Search Engine Optimisation). In the WordPress world, one of the best tools for this is a plugin called Yoast SEO. This does not guarantee that you’ll get on page one of the search pages, but without a plugin like Yoast SEO you’ll find it much harder. It does the initial work for you that Google requires and then it evaluates your content and offers ways to improve it to meet search engine requirements.
Again, you can install it like the previous plugins and then you’ll need to set up the basics after you activate it. When it’s activated you will see a new item in the WordPress menu (on the left) called SEO. When you click on it you’ll be presented with any problems or improvements that Yoast suggests. You can skip that for now as you’ll be making changes when you develop your website that will fix this. Click on “Company Info” and fill in the details. That’s the basics done and we’ll look at the more detailed setup in a separate guide, including how to link up with Google Search Console (Yoast can connect you with other search tools too, but as nearly 90% of web searches in Ireland are on Google, we’ll concentrate on getting that right).
5. Block The Spam
 One of the plugins that comes with WordPress is Akismet and it’s there to help protect you against spam. After you activate the Akismet plugin you’ll need to create a new account at akismet.com and authorise it. This will require creating an account with WordPress.com, which is different to WordPress.org, which is what you’ve got installed. However, they’re very closely related (both part of the Automattic suite of products) and having a WordPress.com is not going to cost you anything, or cause you any trouble. After this is done you can leave Akismet alone to do its work.
6. Get Personal
 It’s time to make some simple changes to start putting your brand on your website. Click on Appearance in the WordPress menu and then click on “Customize” from the sub menu. On the page that loads, pick “Site Identity” and enter your site name, subtitle and then upload your logo.
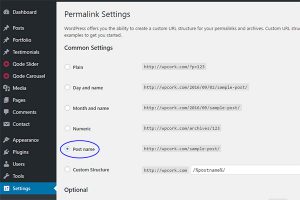
Next, you’ll want to ensure that when someone lands on your webpage your web address look like “https://wpcork.com/contact-us” and not “https://wpcork.com/2016/08/sample-post” which is not as user friendly. This is an easy fix. Just click on Settings and then Permalinks in your WordPress menu. Choose “Post Name” and click “Save Changes”. Job done.


